
Important – Before You Start
· Before operating the tester, refer to User Manual
· Always follow battery manufacturer instructions and use safety recommendations
Connections And Data Ports
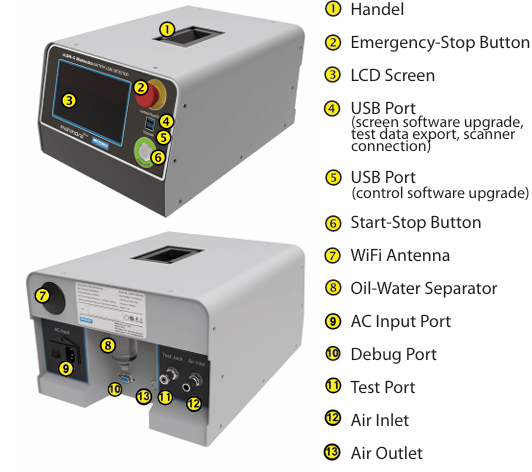
Test Preparation
Check the Test Air Supply. Connect the air supply to the air inlet of the tester. Pay attention to the air supply pressure, it will affect the inflation time, the device will inflate slowly or trigger a low
pressure alarm if the flow rate is too low.
Check the Driving Air Supply, the required pressure should be provided in accordance with the instructions to ensure normal
operation.
Connection
1.The external AC power supply connection
2. Tube connection
- Take out the air tube, one side is with a C-type self-locking connector.
- Point the other end of the air tube towards the air inlet connector on the device and remove the nut from the air inlet connector.
- Screw the nut of the air inlet connector onto the air tube.
- Place the air tube over the air inlet connector of the device to ensure a secure connection.
- Use a tool to tighten the nut and ensure that the nut is securely connected.(Recommend using a 14mm fixed open wrench or an 8-inch adjustable wrench).
3. Avoid dirt and blockage around the outlet port, which will affect the vent.Plug the high-pressure connector and tighten it.Plug the low-pressure connector and tighten it.
- Plug the high-pressure connector and tighten it.
- Plug the low-pressure connector and tighten it.
- Remove the vent valve bolt and install the test connector. The test connector must be installed smoothly without air leakage.